Tuesday, April 19, 2016

Linux Administration

Dear Technocrats,

Through this post, I am going to explore needs and solutions towards linux administration. In this world of Big Data, the needs of storage and processing is growing day by day. To meet with better storage and processing, recoverability, availability of files, you must understand the architecture of your system/network. Specially for the new learners of Big Data administration, a good knowledge of Linux administration commands is must. For the same cause, I am going to extend this post on time to time basis for better understanding of Linux architecture... First I am starting with some basic commands:

Linux is an open source, multiuser operating system. It is inherited from Unix architecture. Linux has many flavors like Ubuntu, mint, CentOS etc. All these flavors have their versions which are updated on timely basis. To work on Linux we must be handy with commands described underneath:

[The commands will run on terminal, you can open it via (ctrl+alt+T)]

After opening the terminal, type the commands on the terminal as shown below and the result.


There are some network related commands eg. ifconfig, arp, route, finger, traceroute etc. try to run all these on your terminal and see the results as shown in the image below:


Updating path variable:
Setting path in Ubuntu can be either permanent or temporary. For making permanent entry for a path, update it with existing entries in /etc/environment file. add your new path after putting : before adding new path within " " braces of path variable. If you want to add temporarily, you can do it directly using terminal. We have taken an example of adding path where earlier path has been removed. So we are updating path variable as shown:


Home directory:

There are more than one home directory in Linux. the home of root ($ cd /), and the home of user ($ cd ~) from which you are logged in to the system. The user credentials come inside home subdirectory of root. To understand the location of user home directory inside your system follow the command given in the screen below:


Adding and Removing user account:
Linux a multiuser operating system. So in next steps you will learn how to add and remove user accounts from a Linux terminal:


File Permissions:

Linux has file permissions rwx (read, write, execute) in three pairs for (owner, group, and others).

There are total identifiers, first bit show whether the element is directory (d) or file (-). Rest 9 identifiers are in the group of 3 permissions (rwx) for owner, group, and others respectively. Have a look on the screen-shot of file permissions:

Note: by default permission bits of a file when it is created first time is controlled by umask. By default umask for files is 666 and directories is 777.

Editors: (vi, vim, etc...)

Working on editors in Linux also needs knowledge of its modes. vi or vim are the editors of Linux. In Linux editor works in two modes: Command mode, and Insert mode. By default we enter in command mode when we open/create any file using (vim file_name). To write anything in this file just press "i" or "a" to enter in Insert mode. Now you can write whatever you want. After finishing writting press "esc" to come out of write mode and enter in command mode again. Now to just quit write ":q", to save/write and quit ":wq" and to quit without saving file ":q!" and press "enter". You will be back to your terminal. Happy Editing...


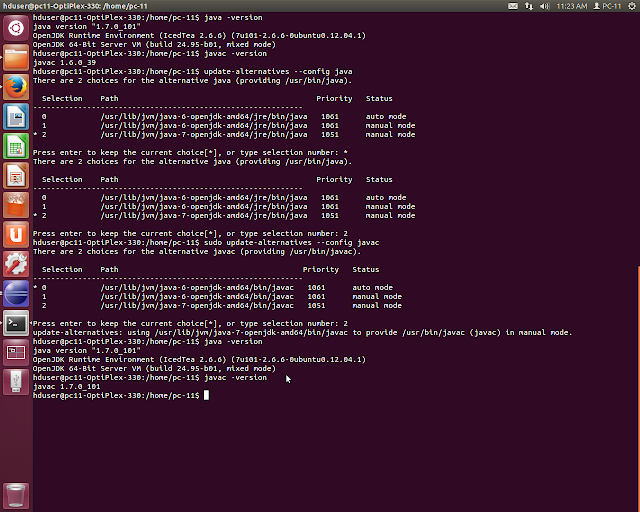
Setting up JAVA and JAVAC version:

If we are having more than one java versions in our system there may be conflict in java or javac. To keep all these synchronize follow the commands as shown in the figure below:


grep utility: grep is one of the most used searching utility in unix environment. grep enables the user to perform various customized searchings as shown:


For more specific commands related to Linux administration and networking, the blog will be updated on regular basis. For shell scripting visit this post

For frequent updates on Big Data Analytics keep visiting this blog or like at this page .


Monday, March 14, 2016

Configuring Jaql in your hadoop cluster

Dear Technocrats,

Jaql is an scripting language specifically designed for JSON files. These files are generally generated by web searches for eg. Twitter Analysis.

In this post I am showing the procedure to configure jaql in your hadoop cluster.
Its again very simple procedure to follow up.

Just download jaql tar file online from apache store. keep anywhere in your system and copy its path. Set this path as JAQL_HOME in your bashrc file.

then go to bin and just type ./jaqlshell. You will be redirected to jaql shell prompt for jaql scripting.


Note: adding the path in .bashrc file as as you opened it via vim or gedit
                  $ gedit ~/.bashrc         or       $ vim ~/.bashrc
you will see bashrc file, just go to the end of the file and make the entry of your jaql home as shown below:


Save the file and start ./jaqlshell to do the analysis using jaql. Jaql fits best to analyze the json files as in twitter trend analysis.

Enjoy Jaql scripting.

To get more frequent updates, like our page.

or

Go to the Home-page of this blog.

Friday, March 11, 2016

Configuring hbase on hadoop cluster

Dear Technocrats,


Greetings...

In this post I am showing the procedure to install and use hbase shell on your hadoop cluster.

first download hbase stable version from apache site. unzip the tar file and go to it. Make the necessary changes in bin/hbase-site.xml file as shown.


 Also mention JAVA_HOME=path to your java in conf/hbase-evn.sh save and exit.

Then run the start-hbase.sh from bin as shown in screenshot...


Now hbase is running on your hadoop cluster as shown above. But hbase does not directs you to the hbase shell by default.

To use hbase shell you will have to run the command ./bin/hbase shell in $HBASE_HOME. Now you can use your hbase shell, program over there and come out of this after programming by typing quit on hbase shell. Complete procedure is as shown:


Enjoy hbase scripting. Wish you all the best... (y)

Thursday, March 10, 2016

Pig installation on hadoop cluster

Dear Technocrats,


In this post, I am explaining the procedure of pig installation on your hadoop cluster ( we have hadoop 2.6.0 configured cluster in our lab).

Pig configuration:
1. download pig-0.x.x
2. Set java path in .bashrc file.
3. pig-0.x.x/bin directory.
4. run the command $ ./pig -x local
5. It will bring you up to grunt shell as shown in the screen-shot below:


grunt is the pig shell. So enjoy scripting using pig on your cluster.

(Note: Pig installation needs java 7 or higher. So if you are using any lower version, then switch to higher version)

Working on grunt shell:

Let you have two files each having two columns. You wish to join those tables corresponding to one common column. It is as simple as 4 lines of code in pig terminal as shown in program screen shot below:


Analysis of Sample healthcare dataset:

This is the analysis of sample dataset of healthcare record having entries of patient name, disease, gender, age etc. Here is the procedure to find the number of male candidates suffering from Swine Flu.


For more frequent updates visit our page

Tuesday, January 12, 2016

Hadoop Benchmark application tests

Hello friends,

In the series of hadoop benchmark application test, another test is: testbigmapoutput. It creates and test A map/reduce program that works on a very big non-splittable file and does identity map/reduce on that. The running format of command and the result on your cluster will be as shown in the screenshot.


threadedmapbench:


To more benchmark tests, keep visiting this post and to start from installation, Go to this link


To support our initiative like our center of Excellence

Monday, December 21, 2015

Running Benchmark tests in hadoop

Dear friends...


Today, I am writting this blog to make you understand about how to run a benchmark test in hadoop cluster.

Benchmark application tests are already in hadoop distribution. you just need to run and test the performance of your cluster.

The command to run the TestDFSIO is as shown below:


This is how you can run various tests in hadoop cluster. You will get the final results of this commands like this:


Another Benchmark test that you can run in your hadoop cluster is: mrbench. This test creates many small jobs and tests their working in your cluster as shown.


The results of this benchmark test will be shown like this:


Wanna give more time to benchmark tests, then visit next page

Hope It will help you...

For more updates keep visiting this blog or our facebook page

Sunday, December 20, 2015

Steps to install hadoop in Ubuntu

Hello Friends...


In this blog I am explaining the procedure to install hadoop single node cluster in Linux. I installed hadoop 2.6.0 on Ubuntu 12.04. Hadoop installation needs basic working knowledge of Linux. I hope you have basic working knowledge of linux or have a look on this post for basic understanding of Linux first: Linux administration.

The steps for installing hadoop are as following:

1. First open the terminal by Ctrl+Alt+T.
2. Run the update command: sudo apt-get update
First it will prompt for your password, and then it may take time depending upon your internet
speed and system update status.
3. Then install java in your sytem using $ sudo apt-get install openjdk-6-jdk
Note: I used java version 6, you can opt for higher version 7 or 8.
To change java version in your system you can run the command:
            $ update-alternatives --config java


4. check java version by using: $ java -version

5. Add a new group named hadoop: $ sudo addgroup hadoop
6. Then make a new user hduser in that group: $ sudo adduser –ingroup hadoop hduser
It may ask for some details like name, address, etc. Fill these details although you may skip some of these.
7. Now for communication install the ssh: $ sudo apt-get install ssh
8. Generate the RSA public private key pair using SSH and move this to the authorized_keys as shown in following steps:


9. Add localhost as secure channel using ssh: $ ssh localhost
10. Now install the freely available hadoop version from any site ( I downloaded 2.6.0)
11. Untar the downloaded package using the command: $ tar xvzf hadoop-2.6.0.tar.gz

Now make the hadoop directory inside /usr/local by the command: mkdir -p /usr/local/hadoop

12. Now change directory to this folder using: $ cd hadoop-2.6.0

13. Now move all content of this directory to the /usr/local/hadoop
   
14. This may throw an error like:
hduser is not in the sudoers file. This incident will be reported......
15. To deal with this error add hduser to the sudoers file as shown

16. Now again move the folder as tried previously and change its ownership to the hduser as shown:

17. Now we are almost done, and just need to change the configuration file. The following files
needs to be changed
1. ~/.bashrc
2. hadoop-env.sh
3. core-site.xml
4. mapred-site.xml
5. hdfs-site.xml

18. Open bashrc by the comand ( vim ~/.bashrc) and add the hadoop path to the directory as shown: [If vim is not already installed on your system, install it by following command sudo apt-get install vim  (after it again try to open the .bashrc file as shown:) vim ~/.bashrc


19. Now open ( $ vim /usr/local/hadoop/etc/hadoop/hadoop-env.sh) and update hadoop-env.sh as shown


20. Now First make a tmp directory as mentioned in the given step:


Now open and update core-site.xml as shown:


Now first copy content of mapred-site.xml.template to mapred-site.xml by the command shown in the image below:


21. Now open and update mapred-site.xml as shown (opening command in the image above and opened file and necessary changes in the image underneath)


22. Now make two directories for namenode and datanode and then make corresponding updates in hdfs-site.xml


Updates in hdfs-site.xml


23. Now we are done... !!
24. Lets start the hadoop now,
25. first format the namenode

26. Then start the hadoop:
27.Change the directory where start-all.sh file resides:
28. Now start hadoop : $ start-all.sh and check the status of the node using the command $ jps

Errorfree start of the hadoop environment will show Namenode, SecondaryNameNode,
NodeManager, DataNode, ResourceManager and jps itself as running processes. So we are done.
29. Lets see the web interface of Namenode and Secondary namenodes:
Namenode at port 50070 of localhost:


We are done.... All components are working fine.

30. Last one.... Dont forget to leave hadoop cluster without stoping the services by the following commands:


If you wish to make a multinode hadoop cluster. Please refer the instructions given at following post hadoop multinode installation

*****************************************************************************

Now to run the first program on your hadoop cluster Please follow this blog: Running first program in hadoop

For configuring hbase in your hadoop cluster visit this post

For configuration of pig in your hadoop cluster go to this pig-installation-page


For more frequent updates about Big data Analytics using hadoop please visit and like: DataioticsHub


Thanks and Regards