Tuesday, May 22, 2018

Hadoop Multinode cluster installation steps

Dear Technocrats,

After installing hadoop in single nodes, it can be easily extended as a multinode cluster. for single node installation please refer my previous post.
This post is intended for expert practitioners who have already installed hadoop on single nodes and are very familiar with common commands and paths.

In a multinode you will have a masternode ie. (Namenode ) and slavenodes (datanodes) as many as you wish to add.


The steps to make multinode hadoop cluster are as following.

1. update the /etc/hosts file of all nodes with ip addresses and userdefined names of your masternode and slavenodes. By doing this you can refer any node by name rather than by its ip. It makes the configuration simple and understandable.

2. Now as masternode will need to access resources i.e hdfs locations etc., for the same you need to authorize all these communication through SSH. To do it copy the SSH key of masternode to authorized_keys of all datanodes.

3. Update the masters and slaves file under configuration folder. For hadoop 2.x all configuration files are found under hadoop-2.x/etc/hadoop directory. Mention name of all slavenodes in slaves file. You need to make masters files in this directory and write the name of masternode in this file. Save and close both these files. Do this on masternode configuration only. You need not to do it on datanodes configuration.

4. Now update the core-site.xml & mapred-site.xml. You just need to change the 'localhost' word with 'masternode' in all properties wherever applicable. Perform this on all nodes i.e masternode as well as slavenodes.

5. Format namenode from masternode and start all services from there. You multinode cluster is ready. If all goes well you will see the cluster having multiple datanodes as shown in below images.


Note: I have two different variations of hadoop2.x installed on my two different machine. So It will show you notification for the same as below.


Note: If datanode/nodes does not appear in cluster stop all, format the temporary storage of your hadoop framework and start the cluster again. You will get all your components working. For any other issue write comment on this post. I ll try to resolve the same...

Tuesday, November 21, 2017

Latest technologies and tends in IT industry

Dear All,

In this post we will discuss about latest trends in IT industry. These topics can be chosen for seminar topics in your academic curriculum.

Have you heard about BlockChaining, Webscrapping & elasticsearch. Both of these are trending technologies in IT industry now a days.

  • BlockChaining:
Blockchaining is a distributed system application. The term block Chain was coined in 2008 and was implemented as a core component in digital currency i.e bitcoin in 2009. Block chain is secure by cryptographic design. The block are immutable entity in this architecture. It is used as a digital ledger to keep record of electronic transactions. Due to replication of data on immutable nodes it is tolerant to hacking attacks. To adversely affect any value in a block the intruder will need to access all the nodes where the data is replicated which has quite low probability of occurrence.


  • Elasticsearch:
In the era of data Analytics, elasticsearch is new tiger of the market. It is again a distributed and RESTful analytics engine with extensive capabilities of integration with different technology platforms. It can also be used along with hadoop for faster analysis. It uses inverted indexing in its core for analysis. Just like hadoop it is horizontally scalable in nature.

  • IoT- Internet of Things:

You all might be aware of the customization of products and ease of access and control. All these are small footprints of coming era of IoT. Every device connected with every other device, communicating without any human intervention. For a non-techie its just a market shift in product segments but for a tech guy its a field poured with challenges as well as opportunities in all segments. You can design and test various models using Raspberry-pi and packet-tracer frameworks.


  • Data Streams and Data Pipes
Data Pipes are the technology frameworks which works in between two or more platforms which may be working as data source, processing framework or data sink. In this world of big data these technologies have utmost importance as there are different data sources distributed across the globe and you may need to bring all data to one processing framework. Some of the data piping solutions also offers on the go processing and vigilance of the events or data logs. Kafka and NiFi are two revolutionary technologies which are making their strong presence in this domain with wide applicability.

some more details and other topics will appear soon on this post. To keep track of industry trends in the field of big data, IoT & Analytics like our initiative at DataioticsHub

Thursday, July 20, 2017

Updating version of R in ubuntu

Dear Technocrats,

This post is for R/Rstudio programmers. As we all know that Rstudio is a package based framework. Many new packages are not supported by older version of R. So in this post I am explaining the procedure to update version of R in your system.

I was having R 3.2.x in my Ubuntu Machine,


and I am showing step by step procedure to update the R version to 3.4.x.

(Note: As we know that R is already installed in our system so it needs to be upgraded. For this we need to mention its online repository path in /etc/apt/sources.list file as shown below:

Now save this and run sudo apt-get update command. It may throw an error as shown below:


To solve this problem you need to authenticate public key by these two commands


After this run the commands

sudo apt-get update
sudo apt-get upgrade r-base

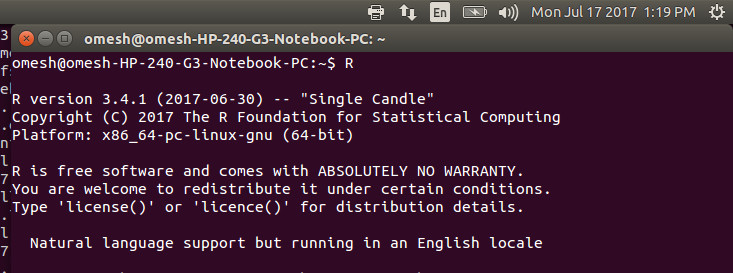
you will get your updated version of R on your Ubuntu Machine as shown.


Hope this post will be helpful. For more updates keep visiting the blog.


Wednesday, July 19, 2017

Installation of R in Ubuntu

Dear Technocrates,

Now a days R is getting more and more focus due to its ease of use for implementation of machine learning algorithms on large data analysis projects and for data visualization.

In this post I am giving steps to install R and Rstudio in your Ubuntu Machine. Installation of R/Rstudtio in ubuntu is just 3 steps procedure.

1. sudo apt-get update
2. sudo apt-get install r-base

These commands will install available version of R in your machine. You can check the version of R by type the command R on your terminal. To come out of terminal just type

quit();

It will ask to save or not to save your workspace as per your choice just come out of the terminal.
To install the R studio now download the rstudio-1.0.143-amd64.deb in your system and just give the command sudo gdebi rstudio-1.0.143-amd64.deb . Ensure that you are in the same directory in which debian file is downloaded or you have given the right path to that file.
Note: if gdebi is not installed in you system just install it first by simple command:
sudo apt-get install gdebi

You are done. just type rstudio in your terminal as shown:


you will have the rstudio GUI interface in your system as shown below.


Now you can play with features of R on this Rstudio interface. For more updates of programming with R keep visiting the blog.

Rstudio is a package based programming framework. You just install the packages form right side window packages and install option. just type the package you need to install and it will be installed with no efforts.

Most of the packages will be installed simply. But a few new packages may throw error. It is due to version of R. If you have some older version of R installed on your machine there is no escape plan to install new packages in Rstudio other than upgrading your R version.

How to upgrade R in Ubuntu
Upgrading R version in Ubuntu is tricky procedure. Visit this post to find the steps to upgrade R version in Ubuntu machine.


Tuesday, October 25, 2016

Shell scripting

Shell is an interface between the user and kernel. Shell takes the input from end user and converts is into a code understandable to the underlying kernel. Unix shells includes, sh, bash, Ksh, etc. The default shell in linux flavour is bash. Bash stands for Bourne Again SHell. The details of shell programming are as following:

Before proceeding towards programming, we must understand the capabilities of shell. Shell has a rich collection of variables as well as parameters. It has environment variables, positional parameters and special built in variables. 
Shell special parameters are as following:

$$ : Contains process id of current shell.

$# : Contains the number of command line arguments.

$0 : Contains the name of the current shell / script.

$? : Contains the exit status of last executed command.

$* : Contains entire string of arguments.

$@ : Contains set of all arguments (we can say equivalent of $*)

$! : Contains process id of last background command.


Other than these shell has 9 positional parameters from $1 to $9. Environment variables includes  HOME, IFS, PATH, PS1, PS2, PWD, and so on. To get the value of any of these parameters you can write echo $VARIABLENAME, as shown below:


For more updates keep visiting this blog or like us on facebook page

Monday, August 29, 2016

Interview questions in big data field

Dear Technocrats,

In this post we are coming up with a series of interview preparation material for those who are looking to get entry in the field of big data analytics. First lets have some common interview tips for all:

  1. Be very attentive while listening before answering any question.
  2. Be very specific and precise in your answers.
  3. In today's fast paced changing IT industry, the recruiter is more focused on well educated personal than the well trained, understand the difference.
  4. Focus more on the outcome of learning, than the syntax of leaning. Having some idea of business use of your technology domain will be a plus.
  5. Show flexibility, rather than rigidity on any technology or platform specially for freshers. 
  6. Asking one or two questions from the interviewer about his company is thought to be a good practice, but avoid making continuous arguments.
  7. A common question from the interviewer can be " when a person is called successful on this post?" 
 
Now we are coming up with a set of questions which are expected to be asked in your interview.

Basic Questions:

  1. What do you think by big data and what are its solution techniques?
  2. What is the difference between structured and unstructured data? Support your answer with examples.
  3. What do you know about NoSQL databases? How those are different from RDBMS?
  4. What is Mapreduce? Explain its phases in detail.
  5. What is distributed file system? How it is different from usual file systems. Explain both with examples.
  6. What are the limitations/shortcomings of mapreduce framework?
  7. Do you know about IBM Watson? How it is helpful in big data analytics?
  8. Is there any relation in big data analytics and cloud computing?
  9. Define horizontal scalability and its benefits in hadoop framework?
  10. Explain the role and working of Namenode, datanode, Jobtracker & tasktracker.
  11. What is the difference between hadoop 1.x and hadoop 2.x?
  12. Explain Sharding and its importance.

Advance level questions:

  1. How kafka can be integrated with hadoop / spark for stream processing.
  2. What is the use of NiFi in big data processing frameworks.
  3. Which NoSQL database is suited for storage and processing of binary data (images).
  4. What is the difference between RDD & DataFrames in Spark.
For more such questions, discussions on polls & technical articles on latest technologies for big data analytics check out the posts on DataioticsHub Page


If you are new to big data analytics, please start reading basics from this post. To understand and learn complete technology stack on big data engineering, visit DataioticsHub

Saturday, August 20, 2016

Software Defined Networks


Software Defined Networks:

Networking lies in the core of any IT infrastructure. We can't think of any computer based business system which is lacking in networking capabilities. Good networking leads to multi-dimensional growth of a computer based system and any business module relying on it.
So its time to upgrade and expand the network capabilities to meet the growing need of IT industry. The new and upcoming needs of IT industry are changed due to SMAC model of business. Every organization wants to be connected more closely with their customers. Every customer as well as every feedback is important for an organization have an edge over its competitors. This needs very robust and flexible network capabilities from network providers.
As networking devices are costly enough, expansion of network in new areas are quite costly. All these deriving forces gave birth to the advent of "Software Defined Networks".
   SDN comes up with the concept of separating the control logic from the underlying hardware and providing centralized administration to the network. SDN enables improved networking capabilities in cloud data centers.

    From Academic research point of view you can take either  open-source tool NS-3 "Network Simulator-3" or Mininet as your simulation tools and ride of wave of SDN by contributing some good research from your side to the community. NS-3 has OpenFlow as and protocol set module to showcase the functioning of SDN. The module comes up with coding in C++ and optional binding option with python. Basic knowledge of Linux will be a plus in networking domain specially in SDN.

Keep an eye on post update to get deeper aspects of SDN with practical exposure.

Wednesday, July 6, 2016

twitter data download procedure

Dear Technocrats,

In this post we are going to discuss about social site analysis. Social sites are not inseparable part of personal as well as enterprise life. Analysis of social sites' comments, reviews and feedback provides a fast, reliable closed loop tie up between service provider and his end user.

First step for social site analysis is to get data from that site. For this social sites are providing API (Application Programming Interface) to the users to get some sample data for analysis.

Here is the procedure to download data from twitter public API:


After running this command the twitter data is saved in tweets100.json file. The data downloaded from twitter looks like this:


For more frequent updates on Social, Mobility, Analytics, and Cloud visit our page.

Tuesday, May 31, 2016

Machine Learing: A new trend in big data analytics

Machine Learning is the field of computer science which deals with finding patterns in the data available based on some algorithms. These algorithms are capable to deal with huge amount of data and tried to find some useful pattern or we can train the dataset according to some clustering or classification algorithm. Learning can be either supervised or unsupervised depending upon its environment.

It is having wide use in big data analytics for trend analysis, demand forecast and various other decision making activities. Apache association have a dedicated tool for machine learning i.e. Mahout.


Apache Mahout is an open source tool which enables to work on various inbuilt machine learning algorithms for clustering or recommendation. I am showing how to run inbuilt hmm (Hidden Markov Model) on Mahout. Currently I am running Mahout in local mode.

As per given instruction of apache mahout first take an input pattern and save it to file and call mahout to make a hmm model based on that.


With option -o we have made and output file having hmm model. Now apply this model to find prediction of any length.


I ll soon come up with more examples on machine learning using Mahout.

Machine learning algorithms are much easier to be implemented and visualized in Rstudio. Please visit this post for Installation of R & Rstudio.Other than that you can also go for python environment to implement machine learning algorithms.

To get frequent updates on big data analytics like our CoE Big Data @ABESEC Gzb .

Tuesday, April 19, 2016

Linux Administration

Dear Technocrats,

Through this post, I am going to explore needs and solutions towards linux administration. In this world of Big Data, the needs of storage and processing is growing day by day. To meet with better storage and processing, recoverability, availability of files, you must understand the architecture of your system/network. Specially for the new learners of Big Data administration, a good knowledge of Linux administration commands is must. For the same cause, I am going to extend this post on time to time basis for better understanding of Linux architecture... First I am starting with some basic commands:

Linux is an open source, multiuser operating system. It is inherited from Unix architecture. Linux has many flavors like Ubuntu, mint, CentOS etc. All these flavors have their versions which are updated on timely basis. To work on Linux we must be handy with commands described underneath:

[The commands will run on terminal, you can open it via (ctrl+alt+T)]

After opening the terminal, type the commands on the terminal as shown below and the result.


There are some network related commands eg. ifconfig, arp, route, finger, traceroute etc. try to run all these on your terminal and see the results as shown in the image below:


Updating path variable:
Setting path in Ubuntu can be either permanent or temporary. For making permanent entry for a path, update it with existing entries in /etc/environment file. add your new path after putting : before adding new path within " " braces of path variable. If you want to add temporarily, you can do it directly using terminal. We have taken an example of adding path where earlier path has been removed. So we are updating path variable as shown:


Home directory:

There are more than one home directory in Linux. the home of root ($ cd /), and the home of user ($ cd ~) from which you are logged in to the system. The user credentials come inside home subdirectory of root. To understand the location of user home directory inside your system follow the command given in the screen below:


Adding and Removing user account:
Linux a multiuser operating system. So in next steps you will learn how to add and remove user accounts from a Linux terminal:


File Permissions:

Linux has file permissions rwx (read, write, execute) in three pairs for (owner, group, and others).

There are total identifiers, first bit show whether the element is directory (d) or file (-). Rest 9 identifiers are in the group of 3 permissions (rwx) for owner, group, and others respectively. Have a look on the screen-shot of file permissions:

Note: by default permission bits of a file when it is created first time is controlled by umask. By default umask for files is 666 and directories is 777.

Editors: (vi, vim, etc...)

Working on editors in Linux also needs knowledge of its modes. vi or vim are the editors of Linux. In Linux editor works in two modes: Command mode, and Insert mode. By default we enter in command mode when we open/create any file using (vim file_name). To write anything in this file just press "i" or "a" to enter in Insert mode. Now you can write whatever you want. After finishing writting press "esc" to come out of write mode and enter in command mode again. Now to just quit write ":q", to save/write and quit ":wq" and to quit without saving file ":q!" and press "enter". You will be back to your terminal. Happy Editing...


Setting up JAVA and JAVAC version:

If we are having more than one java versions in our system there may be conflict in java or javac. To keep all these synchronize follow the commands as shown in the figure below:


grep utility: grep is one of the most used searching utility in unix environment. grep enables the user to perform various customized searchings as shown:


For more specific commands related to Linux administration and networking, the blog will be updated on regular basis. For shell scripting visit this post

For frequent updates on Big Data Analytics keep visiting this blog or like at this page .


Monday, March 14, 2016

Configuring Jaql in your hadoop cluster

Dear Technocrats,

Jaql is an scripting language specifically designed for JSON files. These files are generally generated by web searches for eg. Twitter Analysis.

In this post I am showing the procedure to configure jaql in your hadoop cluster.
Its again very simple procedure to follow up.

Just download jaql tar file online from apache store. keep anywhere in your system and copy its path. Set this path as JAQL_HOME in your bashrc file.

then go to bin and just type ./jaqlshell. You will be redirected to jaql shell prompt for jaql scripting.


Note: adding the path in .bashrc file as as you opened it via vim or gedit
                  $ gedit ~/.bashrc         or       $ vim ~/.bashrc
you will see bashrc file, just go to the end of the file and make the entry of your jaql home as shown below:


Save the file and start ./jaqlshell to do the analysis using jaql. Jaql fits best to analyze the json files as in twitter trend analysis.

Enjoy Jaql scripting.

To get more frequent updates, like our page.

or

Go to the Home-page of this blog.

Friday, March 11, 2016

Configuring hbase on hadoop cluster

Dear Technocrats,


Greetings...

In this post I am showing the procedure to install and use hbase shell on your hadoop cluster.

first download hbase stable version from apache site. unzip the tar file and go to it. Make the necessary changes in bin/hbase-site.xml file as shown.


 Also mention JAVA_HOME=path to your java in conf/hbase-evn.sh save and exit.

Then run the start-hbase.sh from bin as shown in screenshot...


Now hbase is running on your hadoop cluster as shown above. But hbase does not directs you to the hbase shell by default.

To use hbase shell you will have to run the command ./bin/hbase shell in $HBASE_HOME. Now you can use your hbase shell, program over there and come out of this after programming by typing quit on hbase shell. Complete procedure is as shown:


Enjoy hbase scripting. Wish you all the best... (y)

Thursday, March 10, 2016

Pig installation on hadoop cluster

Dear Technocrats,


In this post, I am explaining the procedure of pig installation on your hadoop cluster ( we have hadoop 2.6.0 configured cluster in our lab).

Pig configuration:
1. download pig-0.x.x
2. Set java path in .bashrc file.
3. pig-0.x.x/bin directory.
4. run the command $ ./pig -x local
5. It will bring you up to grunt shell as shown in the screen-shot below:


grunt is the pig shell. So enjoy scripting using pig on your cluster.

(Note: Pig installation needs java 7 or higher. So if you are using any lower version, then switch to higher version)

Working on grunt shell:

Let you have two files each having two columns. You wish to join those tables corresponding to one common column. It is as simple as 4 lines of code in pig terminal as shown in program screen shot below:


Analysis of Sample healthcare dataset:

This is the analysis of sample dataset of healthcare record having entries of patient name, disease, gender, age etc. Here is the procedure to find the number of male candidates suffering from Swine Flu.


For more frequent updates visit our page

Tuesday, January 12, 2016

Hadoop Benchmark application tests

Hello friends,

In the series of hadoop benchmark application test, another test is: testbigmapoutput. It creates and test A map/reduce program that works on a very big non-splittable file and does identity map/reduce on that. The running format of command and the result on your cluster will be as shown in the screenshot.


threadedmapbench:


To more benchmark tests, keep visiting this post and to start from installation, Go to this link


To support our initiative like our center of Excellence

Monday, December 21, 2015

Running Benchmark tests in hadoop

Dear friends...


Today, I am writting this blog to make you understand about how to run a benchmark test in hadoop cluster.

Benchmark application tests are already in hadoop distribution. you just need to run and test the performance of your cluster.

The command to run the TestDFSIO is as shown below:


This is how you can run various tests in hadoop cluster. You will get the final results of this commands like this:


Another Benchmark test that you can run in your hadoop cluster is: mrbench. This test creates many small jobs and tests their working in your cluster as shown.


The results of this benchmark test will be shown like this:


Wanna give more time to benchmark tests, then visit next page

Hope It will help you...

For more updates keep visiting this blog or our facebook page

Sunday, December 20, 2015

Steps to install hadoop in Ubuntu

Hello Friends...


In this blog I am explaining the procedure to install hadoop single node cluster in Linux. I installed hadoop 2.6.0 on Ubuntu 12.04. Hadoop installation needs basic working knowledge of Linux. I hope you have basic working knowledge of linux or have a look on this post for basic understanding of Linux first: Linux administration.

The steps for installing hadoop are as following:

1. First open the terminal by Ctrl+Alt+T.
2. Run the update command: sudo apt-get update
First it will prompt for your password, and then it may take time depending upon your internet
speed and system update status.
3. Then install java in your sytem using $ sudo apt-get install openjdk-6-jdk
Note: I used java version 6, you can opt for higher version 7 or 8.
To change java version in your system you can run the command:
            $ update-alternatives --config java


4. check java version by using: $ java -version

5. Add a new group named hadoop: $ sudo addgroup hadoop
6. Then make a new user hduser in that group: $ sudo adduser –ingroup hadoop hduser
It may ask for some details like name, address, etc. Fill these details although you may skip some of these.
7. Now for communication install the ssh: $ sudo apt-get install ssh
8. Generate the RSA public private key pair using SSH and move this to the authorized_keys as shown in following steps:


9. Add localhost as secure channel using ssh: $ ssh localhost
10. Now install the freely available hadoop version from any site ( I downloaded 2.6.0)
11. Untar the downloaded package using the command: $ tar xvzf hadoop-2.6.0.tar.gz

Now make the hadoop directory inside /usr/local by the command: mkdir -p /usr/local/hadoop

12. Now change directory to this folder using: $ cd hadoop-2.6.0

13. Now move all content of this directory to the /usr/local/hadoop
   
14. This may throw an error like:
hduser is not in the sudoers file. This incident will be reported......
15. To deal with this error add hduser to the sudoers file as shown

16. Now again move the folder as tried previously and change its ownership to the hduser as shown:

17. Now we are almost done, and just need to change the configuration file. The following files
needs to be changed
1. ~/.bashrc
2. hadoop-env.sh
3. core-site.xml
4. mapred-site.xml
5. hdfs-site.xml

18. Open bashrc by the comand ( vim ~/.bashrc) and add the hadoop path to the directory as shown: [If vim is not already installed on your system, install it by following command sudo apt-get install vim  (after it again try to open the .bashrc file as shown:) vim ~/.bashrc


19. Now open ( $ vim /usr/local/hadoop/etc/hadoop/hadoop-env.sh) and update hadoop-env.sh as shown


20. Now First make a tmp directory as mentioned in the given step:


Now open and update core-site.xml as shown:


Now first copy content of mapred-site.xml.template to mapred-site.xml by the command shown in the image below:


21. Now open and update mapred-site.xml as shown (opening command in the image above and opened file and necessary changes in the image underneath)


22. Now make two directories for namenode and datanode and then make corresponding updates in hdfs-site.xml


Updates in hdfs-site.xml


23. Now we are done... !!
24. Lets start the hadoop now,
25. first format the namenode

26. Then start the hadoop:
27.Change the directory where start-all.sh file resides:
28. Now start hadoop : $ start-all.sh and check the status of the node using the command $ jps

Errorfree start of the hadoop environment will show Namenode, SecondaryNameNode,
NodeManager, DataNode, ResourceManager and jps itself as running processes. So we are done.
29. Lets see the web interface of Namenode and Secondary namenodes:
Namenode at port 50070 of localhost:


We are done.... All components are working fine.

30. Last one.... Dont forget to leave hadoop cluster without stoping the services by the following commands:


If you wish to make a multinode hadoop cluster. Please refer the instructions given at following post hadoop multinode installation

*****************************************************************************

Now to run the first program on your hadoop cluster Please follow this blog: Running first program in hadoop

For configuring hbase in your hadoop cluster visit this post

For configuration of pig in your hadoop cluster go to this pig-installation-page


For more frequent updates about Big data Analytics using hadoop please visit and like: DataioticsHub


Thanks and Regards